Key Takeaways
- Preparation is Crucial: Starting with clean, dry lashes and using an eyelash curler can make a significant difference in the final look. Don’t skip the prep steps!
- Application Techniques Matter: Using the right techniques, such as starting at the base, using sweeping motions, and building up gradually, can help you achieve a natural, clump-free finish.
- Fix Mistakes Quickly: Knowing how to handle common mistakes like clumping and smudging ensures that your mascara application remains flawless throughout the day.

Mascara is a cornerstone of any makeup routine, and for good reason. It has the magical ability to transform your eyes by adding length, volume, and definition to your lashes. However, achieving that perfect look requires more than just a few swipes of the wand. Proper application can prevent common mistakes like clumping and smudging, ensuring your eyes look stunning all day long.
At Your Beauty Marks, we are committed to helping you achieve flawless makeup looks while emphasizing fashion sustainability and affordability. In this guide, we’ll walk you through seven essential steps to master the art of mascara application. Let’s get started!
1. Gather Your Tools
Before diving into the application process, it’s crucial to have all the necessary tools at your disposal. Having the right tools can make a significant difference in the final outcome. Here’s what you’ll need:
- Eyelash Curler: Curling your lashes before applying mascara adds length and opens up your eyes, making them appear larger and more awake.
- Favorite Mascara: Choose a mascara formula that suits your needs—whether it’s volumizing, lengthening, or waterproof. Each type offers different benefits, so pick one that aligns with your desired look.
- Eyeliner: Complementing your mascara with eyeliner can create a fuller, more dramatic effect. We’ll discuss this in more detail later.
- Optional Items: For beginners, a business card can help guide the application process and prevent smudging. Tissues are also handy for quick fixes and removing excess mascara.
With these tools in hand, you’re ready to move on to the next step. Transitioning smoothly, let’s prepare your eyes for the perfect mascara application.
2. Prepare Your Eyes
Preparation is key to achieving a flawless mascara application. Starting with clean, dry lashes ensures that your mascara adheres properly and lasts longer. Here’s how to prep your eyes:
- Clean, Dry Lashes: Make sure your lashes are free from any residual makeup or oils. Use a gentle makeup remover to cleanse your lashes thoroughly.
- Optional Primer: Applying a lash primer can add an extra layer of volume and length, as well as help your mascara stay put throughout the day. Simply swipe the primer onto your lashes and let it dry before moving on to the next step.
Now that your eyes are prepped, it’s time to master the curl. Transitioning seamlessly, let’s dive into the art of using an eyelash curler effectively.
3. Master the Curl
Curling your lashes is a game-changer when it comes to enhancing their appearance. It lifts and lengthens your lashes, making your eyes look more open and awake. Follow these steps to master the curling technique:
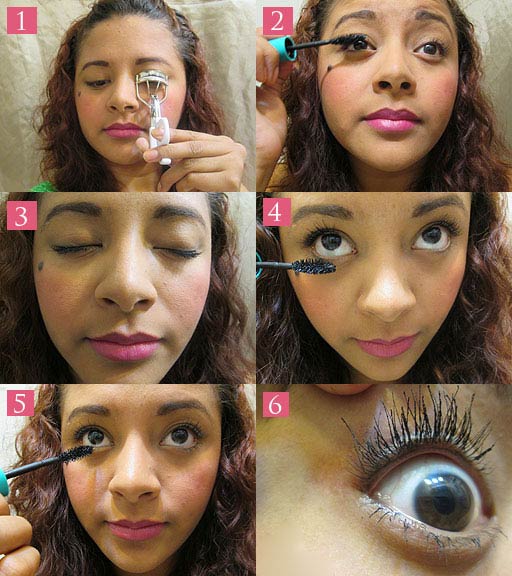
- Position the Curler: Open the eyelash curler and place it at the base of your upper lashes. Ensure that all your lashes are inside the curler.
- Gentle Squeeze: Gently squeeze the curler and hold it for about 10 seconds. Avoid pressing too hard to prevent pinching your eyelid.
- Curl in Sections: For a more natural curl, move the curler slightly up your lashes and squeeze again. Repeat this process until you’ve curled the entire length of your lashes.
With beautifully curled lashes, you’re now ready for the main event: applying your mascara. Transitioning smoothly, let’s explore the perfect mascara application techniques.
4. The Perfect Mascara Application
Applying mascara correctly can make a world of difference in achieving stunning lashes. Follow these techniques to ensure a flawless application:
- Start at the Base: Begin by placing the mascara wand at the base of your lashes. Wiggle the wand back and forth to coat the roots thoroughly. This technique helps to add volume and lift from the base.
- Sweeping Motions: Slowly sweep the wand upwards towards the tips of your lashes. Use a zigzag motion to separate the lashes and avoid clumping. Repeat this process until you achieve your desired look.
- Build Gradually: For a more dramatic effect, apply multiple coats of mascara. Allow each coat to dry slightly before applying the next one. This helps to build up thickness without causing clumps.
Now that you’ve mastered the top lashes, it’s time to give some attention to the bottom lashes. Transitioning seamlessly, let’s uncover the secrets to bottom lash magic.
5. Bottom Lash Magic
Applying mascara to your bottom lashes can be a bit tricky, but with the right technique, you can achieve a balanced and smudge-free look. Here’s how to do it:
- Head Positioning: Tilt your head slightly forward and look up. This angle helps you see your bottom lashes more clearly and reduces the risk of smudging.
- Light Touch: Use the tip of the mascara wand to gently coat your bottom lashes. Apply the mascara in a light, sweeping motion to avoid overloading the lashes with product.
- Even Application: For an even look, start from the outer corner of your bottom lashes and work your way inwards. This ensures that each lash is coated evenly.
With both your top and bottom lashes perfectly coated, it’s time to address any common mistakes that might occur. Transitioning smoothly, let’s explore quick fixes for clumping and smudging.
6. Fixing Common Mistakes
Even with the best techniques, mistakes can happen. Fortunately, there are simple solutions to fix common mascara mishaps like clumping and smudging. Here’s how to handle them:
- Remove Excess Mascara: If you notice clumps forming, use a tissue to gently blot the mascara wand before application. This helps remove excess product and prevents clumping.
- Separate Clumped Lashes: If your lashes do clump together, use the mascara wand or a clean spoolie brush to separate them. Gently comb through your lashes to distribute the mascara evenly.
- Quick Fix for Smudges: If you accidentally smudge mascara on your eyelid or under-eye area, wait for it to dry completely. Once dry, use a clean cotton swab to gently lift the smudge away without disturbing your makeup.
With these quick fixes in your arsenal, you can easily correct any mistakes and maintain a flawless look. Transitioning seamlessly, let’s add the finishing touch with some eyeliner for extra impact.
7. Adding Eyeliner for Extra Impact
To elevate your mascara look, adding eyeliner can make a significant difference. It enhances the overall appearance of your lashes and adds definition to your eyes. Here’s how to do it effectively:
- Timing: Apply eyeliner before your mascara if you prefer a softer look, or after your mascara for a more dramatic effect. Both methods work well, so choose based on your desired outcome.
- Application Technique: Use a steady hand to apply eyeliner along your upper lash line. For a natural look, opt for a thin line. For a bolder look, go for a thicker line or a winged effect.
- Tightlining: For an even fuller lash appearance, consider tightlining. This involves applying eyeliner to the upper waterline (the area just beneath your upper lashes). It creates the illusion of thicker lashes without being overly noticeable.
With your eyeliner perfectly applied, your eye makeup is now complete. Transitioning smoothly, let’s wrap up everything we’ve discussed and emphasize the uniqueness and value proposition of Your Beauty Marks.
Conclusion
Achieving flawless mascara application is an art that can elevate your entire makeup look. By following these seven essential steps, you can ensure that your lashes are perfectly curled, evenly coated, and free from clumps and smudges. Here’s a quick recap:
- Gather your tools: eyelash curler, favorite mascara, eyeliner, and optional items like a business card and tissues.
- Prepare your eyes by starting with clean, dry lashes and optionally applying a primer.
- Master the curl with a step-by-step curling technique.
- Apply mascara perfectly by starting at the base, using sweeping motions, and building up gradually.
- Work your bottom lash magic with the right head positioning and light touch.
- Fix common mistakes like clumping and smudging with quick and easy solutions.
- Add eyeliner for extra impact and enhanced definition.
At Your Beauty Marks, we believe in empowering you to embrace your unique eye shape and experiment with different techniques to find what works best for you. Practice makes perfect, so don’t be afraid to try these steps and make them your own.
Frequently Asked Questions
How do I choose the right mascara formula?
Choosing the right mascara formula depends on your desired look and lash type. If you want more volume, opt for a volumizing mascara. For longer lashes, choose a lengthening formula. Waterproof mascaras are great for long-lasting wear, especially in humid conditions or for special occasions.
Can I use an eyelash curler after applying mascara?
It’s generally not recommended to use an eyelash curler after applying mascara, as this can cause your lashes to stick to the curler and potentially break. Always curl your lashes before applying mascara for the best results.
How can I prevent my mascara from smudging?
To prevent smudging, ensure your lashes are clean and dry before application. Using a primer can also help. Additionally, consider setting your under-eye area with a translucent powder to absorb any excess oil that might cause smudging.
What should I do if my mascara clumps?
If your mascara clumps, use a clean spoolie brush or the mascara wand to gently separate the clumped lashes. You can also blot the wand with a tissue before application to remove excess product and prevent clumping.
How often should I replace my mascara?
It’s recommended to replace your mascara every three months to avoid bacterial buildup and ensure the best performance. Old mascara can dry out and become clumpy, making it difficult to achieve a smooth application.


