Key Takeaways
- Cost-Effective Glamour: DIY glitter nails offer a budget-friendly alternative to salon visits, allowing you to achieve stunning results without breaking the bank.
- Customization and Creativity: With a variety of glitter types and application techniques, you can personalize your nail design to match any occasion or mood.
- Accessible and Convenient: All necessary materials are easily accessible at local stores or online, making it simple for anyone to create beautiful glitter nails at home.
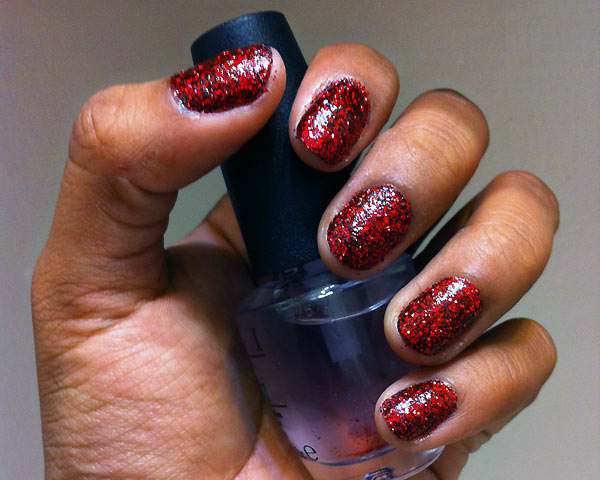
Glitter nails have taken the beauty world by storm, adding a touch of sparkle and glamour to any look. Whether you’re preparing for a special occasion or simply want to add some pizzazz to your everyday style, glitter nails are a fun and creative way to express yourself. The best part? You don’t need to visit a salon to achieve this dazzling effect. By doing your nails at home, you can save money, customize your look, and enjoy the satisfaction of creating your own masterpiece.
In this blog post, we’ll guide you through a simple, step-by-step process to achieve perfect glitter nails right in the comfort of your home. You’ll learn about the materials needed, tips for application, and how to ensure your glitter nails last as long as possible. So, let’s dive into the world of DIY glitter nails!
Materials Needed
Before you begin your glitter nail journey, it’s essential to gather all the necessary materials. Having everything on hand will make the process smoother and more enjoyable. Here’s what you’ll need:
- Glitter: Choose from a variety of types such as fine, chunky, or holographic. You can find these at craft stores or online beauty retailers.
- Clear Nail Polish: Opt for a high-quality brand that offers good adhesion and shine. Brands like OPI or Essie are popular choices.
- Spoon: A small spoon will help you apply the glitter with precision and control.
- Q-tip: Essential for cleaning up any stray glitter around your nails.
- Water: Use to dampen the Q-tip for effective clean-up.
- Optional: Nail Brush: For those finishing touches and to brush away any loose glitter particles.
Once you’ve gathered these items, you’re ready to start creating your glittery masterpiece. Transitioning from preparation to application is the next exciting step!
Step-by-Step Guide to Applying Glitter Nails
Step 1: Prepare Your Nails
First and foremost, ensure your nails are clean and shaped to your liking. Use a nail file to achieve your desired shape, whether it’s square, round, or almond. Clean nails provide a smooth canvas for the polish and glitter, ensuring better adhesion.
Step 2: Apply the First Clear Coat
Next, apply an even layer of clear nail polish to your nails. This initial coat acts as a base, helping the glitter adhere more effectively. Make sure to cover the entire nail surface for the best results.
Step 3: Add Glitter
While the clear coat is still wet, use a small spoon to sprinkle glitter onto your nails. For controlled application, hold your hand over a piece of paper to catch any excess glitter. This not only keeps your workspace tidy but also allows you to reuse the glitter that falls off.
Step 4: Dry Time
After applying the glitter, it’s crucial to let your nails dry for about five minutes. This drying time ensures that the glitter sets firmly into the clear coat, minimizing the risk of smudging or displacement.
Step 5: Seal with a Second Clear Coat
Once the glitter has adhered, apply a second coat of clear nail polish. This layer acts as a sealant, enhancing both the durability and shine of your glitter nails. Be sure to cover the entire nail to lock in the glitter.
Step 6: Repeat Glitter Application
If you desire a more vibrant and bold look, don’t hesitate to add another layer of glitter. Simply repeat the process of sprinkling glitter onto the wet polish, and let it dry again.
Step 7: Brush Away Loose Glitter
After your second glitter application has dried, use a nail brush to gently sweep away any loose glitter particles. This step helps maintain a neat and polished appearance, ensuring that only the glitter adhered to your nails remains.
Step 8: Final Clear Coat
To lock in your glitter design and add an extra layer of protection, apply a final coat of clear nail polish. This topcoat not only enhances the shine but also increases the longevity of your glitter nails, making them more resistant to chipping.
Step 9: Clean Up Excess Glitter
For a flawless finish, use a Q-tip dipped in water to clean up any stray glitter around your nails. The damp Q-tip will attract and remove excess glitter, leaving your nails looking tidy and professional.
Step 10: Let Dry Completely
Finally, allow your nails to dry thoroughly. This step is crucial for ensuring that all layers of polish and glitter are fully set. Patience is key here—avoid touching or using your hands for at least 15-20 minutes to prevent any smudging or dents.
Tips for Perfecting Your Glitter Nails
Technique Variations
If you’re looking for an alternative method, consider using premade glitter nail polish. These polishes offer a quick and easy way to achieve a glittery look without the need for loose glitter. Simply apply as you would any regular nail polish.
Nail Types
It’s important to consider the type of nails you have when applying glitter. Natural nails may require a bit more care to avoid damage, while artificial nails can often handle more layers of polish and glitter. Adjust your application technique accordingly to ensure the best results.
Allergy Awareness
Be mindful of potential allergic reactions to certain types of glitter or nail products. If you have sensitive skin or known allergies, opt for hypoallergenic nail products and perform a patch test before full application.
Cost-Effectiveness and Accessibility
Budget Breakdown
One of the greatest advantages of DIY glitter nails is their affordability. Here’s a quick breakdown of potential costs:
- Glitter: $5-$10 depending on size and type.
- Clear Nail Polish: $8-$12 for a quality brand.
- Additional Tools (Spoon, Q-tip, Nail Brush): Usually under $5 if not already available at home.
In total, you can achieve stunning glitter nails for a fraction of the cost of a salon visit, making it a budget-friendly beauty option.
Where to Find Supplies
Finding the right supplies is easy and convenient. Popular stores like Ulta, Sephora, and even local drugstores carry a wide range of nail products. For those who prefer online shopping, websites like Amazon and Etsy offer a plethora of options, often with customer reviews to guide your choices.
Conclusion
Creating your own glitter nails at home is not only a fun and creative process but also a cost-effective way to enjoy salon-quality results. By following our simple 10-step guide, you can achieve dazzling nails that reflect your personal style and flair. The flexibility to choose your glitter type, color, and application technique allows you to customize your look for any occasion.
We hope this tutorial inspires you to experiment with different styles and techniques. Remember, practice makes perfect, and the more you experiment, the more you’ll refine your skills. So why not give it a try and let your nails sparkle and shine?
Frequently Asked Questions
How long do glitter nails last?
With proper application and care, glitter nails can last up to two weeks. The longevity depends on factors such as the quality of the nail polish used, the number of layers applied, and how well you protect your nails from daily wear and tear.
Can I use any type of glitter for my nails?
While many types of glitter can be used for nail art, it’s best to choose cosmetic-grade glitter specifically designed for nails. This ensures that the glitter is safe for use on your skin and nails, reducing the risk of irritation or allergic reactions.
How do I remove glitter nails?
Removing glitter nails can be a bit more challenging than regular polish. Soak a cotton pad in acetone-based nail polish remover, place it on your nail, and wrap it with aluminum foil. Leave it on for about 10-15 minutes, then gently slide off the foil and cotton pad. The glitter should come off easily. If necessary, use a nail file to gently buff away any remaining glitter.
What if I don’t have a nail brush?
If you don’t have a nail brush, you can use a soft makeup brush or a clean toothbrush as an alternative. These tools can help sweep away loose glitter without damaging your nails.
Are there any tips for making glitter nails last longer?
To extend the life of your glitter nails, avoid using your nails as tools, wear gloves when doing household chores, and reapply a clear topcoat every few days to maintain shine and durability.
Tags: Look Collection, OPI, SEPHORA, Tip Remove, Water Wet


