Key Takeaways
- DIY Nail Art is Empowering: Creating your own nail art at home is not only cost-effective but also allows you to express your individuality and creativity without limits.
- V-Shape Design is Versatile: The V-shape nail art is an elegant and stylish choice that can be customized with various color combinations and embellishments to suit any occasion.
- Care is Crucial for Longevity: Proper nail care and maintenance techniques, such as moisturizing and using a reinforcing top coat, are essential to keep your nail art looking fresh and vibrant for longer.
Nail art has become a beloved form of self-expression, allowing individuals to showcase their creativity and personal style right at their fingertips. With endless possibilities, nail art is more than just a beauty statement—it’s a way to express one’s unique personality. At Your Beauty Marks, we believe everyone should have access to affordable, sustainable beauty solutions that don’t compromise on style or quality.
DIY nail art offers numerous benefits, from significant cost savings to the sheer satisfaction of creating something beautiful on your own. Plus, it’s a fantastic way to unleash your creativity and try out new trends without breaking the bank. In this guide, we’ll walk you through creating a stunning V-shape nail art design, perfect for any occasion and easy enough for beginners to master.
Why Choose V-Shape Nail Art?
V-shape nail art is an elegant and stylish choice that suits any occasion, whether it’s a casual day out or a formal event. Its geometric design adds a modern twist to your nails, making them stand out in a subtle yet sophisticated way. Moreover, this design is quick to achieve, making it an ideal option for those new to the world of nail art.
Not only is the V-shape nail art visually appealing, but it also allows for a variety of color combinations and embellishments, giving you the freedom to customize your look. Whether you prefer bold, contrasting colors or soft, complementary shades, the V-shape design can accommodate your preferences effortlessly.
Materials You’ll Need
- Base coat nail enamel: This is essential for ensuring proper adhesion of the nail polish and providing a protective barrier for your nails.
- Two contrasting nail polish colors: Consider combinations like navy and gold or pastel pink and white for a striking effect.
- Glitter nail polish: Adding glitter can enhance the design, giving your nails a touch of glam and sparkle.
- Tape: Use regular tape or nail striping tape to achieve the V-shape. Alternatively, you can use a thin brush if tape isn’t available.
- Top coat nail polish: This will add shine and ensure the longevity of your nail art.
- Quick-dry solution: A quick-dry solution speeds up the drying process, saving you time and preventing smudges.
- Q-tips and nail polish remover: These are crucial for correcting any mistakes and cleaning up the edges.
With these materials at hand, you’re ready to start creating your V-shape nail art masterpiece!
Step-by-Step Guide to V-Shape Nail Art
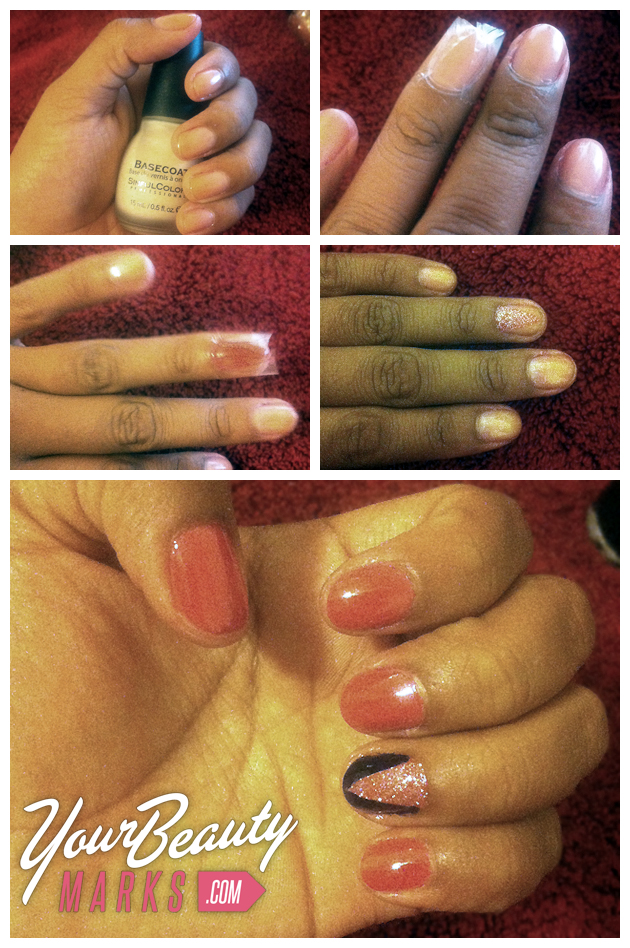
- Step 1: Clean and prep your nails. Begin by removing any old polish and washing your hands thoroughly. File your nails to your desired shape and gently push back your cuticles.
- Step 2: Apply the base coat and allow it to dry. This step is crucial for protecting your nails and ensuring the polish adheres smoothly.
- Step 3: Use tape to create the V-shape. Cut small strips of tape and place them diagonally across each nail to form a V. If you don’t have tape, a thin brush can be used to paint the V-shape freehand.
- Step 4: Apply the first nail polish color. Paint the area outside the V-shape with your chosen color, ensuring even coverage. Be careful not to apply too much polish, as this can lead to smudging.
- Step 5: Wait for the first color to dry completely. Patience is key here; rushing can ruin the crispness of your design.
- Step 6: Add glitter polish for a touch of glam. Apply a thin layer of glitter polish over the first color, focusing on the tips for a gradient effect.
- Step 7: Carefully remove the tape for a clean edge. Gently peel off the tape strips to reveal a sharp V-shape. Ensure the polish is dry to avoid smudging.
- Step 8: Trace the V-shape with a contrasting color for definition. Use a thin brush to outline the V-shape with your second nail polish color, adding depth and contrast to the design.
- Step 9: Apply your second color in the corners and let dry. Fill in the V-shape with the second color, making sure to cover any remaining gaps.
- Step 10: Finish with a top coat and enjoy your nails! Apply a generous layer of top coat to seal in your design, add shine, and protect your nail art from chipping.
And there you have it—stunning V-shape nail art that you can proudly show off!
Tips for Perfecting Your V-Shape Nail Art
To achieve the best results, consider these helpful tips:
- For crisp lines: Ensure the tape is firmly pressed down on your nails to prevent polish from seeping underneath. If you’re painting freehand, use a steady hand and a thin brush for precision.
- For even application: Apply thin layers of polish, allowing each layer to dry completely before adding the next. This helps in preventing bubbles and uneven surfaces.
- Troubleshooting common issues: If you notice bubbles, it’s often due to shaking your polish bottle. Instead, roll the bottle between your hands to mix the polish. For smudges, use a Q-tip dipped in nail polish remover for quick fixes.
With practice and these tips in mind, you’ll master the art of V-shape nail designs in no time!
Caring for Your Nail Art
Once you’ve created your beautiful V-shape nail art, it’s important to maintain it for as long as possible. Here are some ways to care for your nails and extend the lifespan of your design:
- Avoid harsh chemicals: Wear gloves when doing household chores or using cleaning products to protect your nails from damage.
- Moisturize regularly: Keep your hands and cuticles hydrated with a good hand cream or cuticle oil. This prevents dryness and chipping.
- Touch up as needed: If you notice any chips or wear, use a small brush to touch up the affected areas with matching polish.
- Use a reinforcing top coat: Reapply a layer of top coat every few days to maintain shine and add extra protection.
By following these tips, you can keep your nail art looking fresh and fabulous for longer!
Conclusion
Creating V-shape nail art at home is not only a fun and rewarding experience, but it also allows you to express your unique style with ease. With the right materials, a step-by-step guide, and a few helpful tips, you can achieve stunning results that rival salon-quality designs.
We encourage you to experiment with different color combinations, textures, and embellishments to make the V-shape design truly your own. Remember, the world of nail art is vast and full of possibilities, so don’t be afraid to let your creativity shine.
Thank you for choosing Your Beauty Marks as your guide to beauty and self-expression. We hope you enjoyed this tutorial and feel inspired to try more DIY nail art projects. For more beauty tips and trends, be sure to explore our other blog posts.
Frequently Asked Questions
What if I don’t have nail striping tape?
If you don’t have nail striping tape, don’t worry! You can use regular tape cut into thin strips or a thin nail art brush to create the V-shape freehand. Practice makes perfect, so take your time to achieve clean lines.
How can I prevent my nail polish from chipping?
To prevent chipping, ensure that your nails are clean and dry before applying polish. Use a high-quality base coat and top coat, and reapply the top coat every few days for added protection. Additionally, avoid using your nails as tools and wear gloves when doing chores.
Can I use gel polish for V-shape nail art?
Yes, you can definitely use gel polish for V-shape nail art. Gel polish offers a longer-lasting finish and vibrant colors. Just make sure you have the necessary equipment, such as a UV or LED lamp, for curing the gel polish.
How do I fix smudges or mistakes?
If you make a mistake, don’t panic. Use a Q-tip dipped in nail polish remover to carefully clean up smudges or mistakes. For larger errors, you may need to remove the affected area and start over, but practice will help you minimize these occurrences.
What are some popular color combinations for V-shape nail art?
Popular color combinations include black and gold for a luxurious look, pastel shades for a soft and feminine vibe, and bold colors like red and white for a striking contrast. Feel free to experiment with your favorite colors to create a look that’s uniquely yours.


