Key Takeaways
- Cost-Effective and Customizable: Making your own eye gloss saves money and allows you to customize the color and texture to perfectly match your style.
- Simple Materials: All you need are a few basic materials—eye shadow, baby oil, an eye shadow brush, and a container—to create a high-quality, personalized product.
- Endless Experimentation: The DIY process encourages creativity and experimentation, giving you the freedom to try different shades, textures, and additional ingredients like coconut oil or glitter for unique effects.
Eye gloss is the latest trend taking the beauty world by storm, and for good reason. This versatile product enhances the appearance of your eyes, making them look bigger and more vibrant. However, commercial eye glosses can be quite pricey, and store-bought options often come with limitations in terms of color and texture.
At Your Beauty Marks, we believe in beauty that’s both sustainable and affordable. That’s why we’re excited to share this DIY guide with you. In just four simple steps, you’ll learn how to create your own eye gloss easily and affordably, giving you the freedom to customize it to your heart’s content.
Why Make Your Own Eye Gloss?
Before diving into the DIY process, let’s explore why making your own eye gloss is a fantastic idea. Here are some compelling reasons:
Cost-Effectiveness
Commercial eye glosses can be expensive, often costing upwards of $20 for a small container. By making your own, you can save a significant amount of money while still achieving a high-quality product.
Customization
One of the greatest advantages of DIY beauty products is the ability to customize them to your liking. When you make your own eye gloss, you have complete control over the color and texture. Want a subtle shimmer or a bold, dramatic look? The choice is yours!
Experimentation
Creating your own eye gloss allows you to experiment with different shades and formulations. This is perfect for those who love to play with makeup and try out new looks without committing to a full-sized product.
Essential Materials You’ll Need
Ready to get started? First, you’ll need to gather a few essential materials. Here’s what you’ll need:
- Eye Shadow Brush: This will be used for mixing and applying your eye gloss. A small, flat brush works best for precision.
- Eye Shadow: Choose your favorite shades. Both pressed and powdered eye shadows work well, so feel free to experiment with different types and colors.
- Baby Oil: This will be the base of your eye gloss, providing a smooth, glossy finish. Baby oil is gentle on the skin and easy to find.
- Tray or Container: You’ll need a small tray or container to mix your ingredients. A clean, shallow dish or an empty makeup container works perfectly.
With these materials on hand, you’re all set to create your own customized eye gloss. Let’s move on to the step-by-step guide!
Step-by-Step Guide to Making Eye Gloss
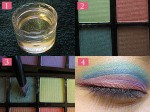
Step 1: Prepare Your Workspace
First, clear a space and gather all your materials for easy access. Ensure your workspace is clean and well-lit to avoid any messes and to see your colors clearly.
Step 2: Mix Your Ingredients
Now that your workspace is ready, it’s time to mix your ingredients. Follow these detailed instructions:
- Using your eye shadow brush, scrape a small amount of eye shadow into your tray or container. Start with a little; you can always add more later.
- Add a few drops of baby oil to the eye shadow. Begin with just a couple of drops and mix thoroughly. You can add more baby oil if needed to achieve your desired consistency.
- Mix the eye shadow and baby oil together until you have a smooth, glossy paste. Adjust the amount of eye shadow or baby oil to get the perfect color intensity and texture.
Tip: If you want a more intense color, add more eye shadow. For a sheerer look, use less eye shadow and more baby oil.
Step 3: Application Techniques
With your eye gloss ready, it’s time to apply it. Here are some techniques to help you achieve different looks:
- Natural Look: For a subtle, everyday look, apply a small amount of eye gloss to your eyelids using your eye shadow brush. Blend it out gently with your finger or a clean brush to create a soft, dewy finish.
- Dramatic Look: For a bold, eye-catching effect, layer the eye gloss over a complementary eye shadow. Apply a generous amount of gloss to the center of your eyelids and blend outward for a high-impact shine.
- Blending and Layering: Don’t be afraid to blend your eye gloss with other products. You can layer it over powdered eye shadow for added depth or mix it with a bit of glitter for a sparkling effect.
Experiment with different application techniques to find the look that suits you best!
Step 4: Clean-Up and Storage
After you’ve created and applied your eye gloss, it’s important to clean up and store your materials properly:
- Cleaning Brushes and Trays: Wash your eye shadow brush and tray or container with warm, soapy water. Rinse thoroughly and let them air dry. This ensures that your tools are ready for the next use and prevents any buildup of product.
- Storing Leftover Eye Gloss: If you have any leftover eye gloss, store it in a small, airtight container. Keep it in a cool, dry place to maintain its consistency and prevent it from drying out. Proper storage will allow you to use your custom eye gloss multiple times.
By following these clean-up and storage tips, you’ll keep your DIY beauty routine efficient and hygienic.
Tips for Experimentation and Personalization
One of the best parts about making your own eye gloss is the freedom to experiment and personalize. Here are some tips to help you get creative:
- Try Different Combinations: Mix and match various eye shadow colors to create unique shades. Don’t be afraid to blend unexpected colors for a custom look that stands out.
- Pressed vs. Powdered Eye Shadow: Experiment with both pressed and powdered eye shadows. Pressed shadows tend to give a more intense color, while powdered shadows can offer a softer, more diffused look.
- Add Other Ingredients: For added benefits and effects, consider incorporating other ingredients. A few drops of coconut oil can provide extra hydration, while a pinch of cosmetic-grade glitter can add a touch of sparkle.
Feel free to play around with different formulations and techniques to discover what works best for you. The possibilities are endless!
Conclusion
Creating your own eye gloss is not only a fun and creative process but also a cost-effective way to enhance your makeup routine. By following these simple steps, you can customize your eye gloss to suit your personal style and preferences. Plus, the ability to experiment with different colors and ingredients means you’ll never run out of new looks to try.
At Your Beauty Marks, we’re committed to helping you achieve beauty that’s both sustainable and affordable. We hope this guide inspires you to get creative and enjoy the benefits of DIY beauty products.
Frequently Asked Questions
Is DIY eye gloss safe for sensitive eyes?
Yes, DIY eye gloss can be safe for sensitive eyes, especially if you use gentle ingredients like baby oil and high-quality eye shadows. However, always do a patch test on a small area of your skin before applying the product to your eyes to ensure you don’t have any adverse reactions.
How long does homemade eye gloss last?
Homemade eye gloss can last for several weeks if stored properly in an airtight container. Keep it in a cool, dry place to maintain its consistency and prevent it from drying out. Always check for any changes in smell or texture before using it again.
Can I use other oils instead of baby oil?
Absolutely! You can substitute baby oil with other skin-friendly oils like coconut oil, jojoba oil, or almond oil. Each oil has its own benefits, so feel free to experiment to find the one that works best for you.
Can I add glitter to my DIY eye gloss?
Yes, you can add cosmetic-grade glitter to your DIY eye gloss for a sparkling effect. Make sure to use glitter that is safe for use around the eyes to avoid irritation.
What type of eye shadow works best for making eye gloss?
Both pressed and powdered eye shadows work well for making eye gloss. Pressed eye shadows tend to give a more intense color, while powdered eye shadows offer a softer, more diffused look. Experiment with both to see which you prefer.
How do I remove DIY eye gloss?
Removing DIY eye gloss is simple. Use a gentle makeup remover or micellar water on a cotton pad to wipe away the gloss. Follow up with your regular facial cleanser to ensure all residue is removed.
Tags: Baby Oil, Eye Gloss


